typescript class

1. OOP(객체 지향 프로그래밍)을 위한 초석
관련있는 변수나 함수, 데이터를 묶어놓는 틀을 class라 한다. 즉, object를 만드는 청사진(설계도)라 할 수 있다. class안에서도 내부적으로 보여지는 변수와 밖에서 보일 수 있는 변수를 나누어서 캡슐화encapsulation 할 수 있고 상속과 다양성이 일어날 수 있는 이러한 모든 것들이 가능한 것이 객체 지향 언어다.
*OOP : 객체의 관점에서 프로그래밍 하는 것
2. TypeScript에서는 클래스도 사용자가 만드는 type의 하나
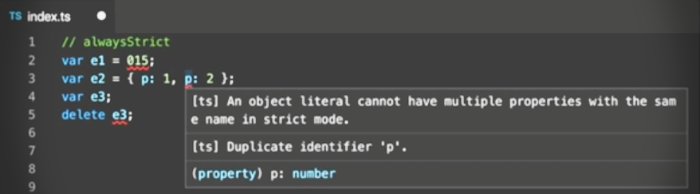
3. JavaScript도 ES6부터 class를 사용 가능하나 접근제어자는 불가능하다.
4. class가 존재하기 이전
object를 만드는 기본적인 방법은 function이었다. 아래와 같이 new키워드로 불러왔음
function Book(type, author) {
    this.type = type;
    this.author = author;
    this.getDetails = function () {
        return this.type + " written by " + this.author;
    }
}

var book = new Book("Fiction", "Peter King");

console.log(book.getDetails());
(class 선언 예제)
class Person {
  name;

  constructor(name: string) {
    this.name = name;
  }

  speak() {
  	console.log(`I'm ${this.name}!!!`);
  }
}

const p1 = new Person("siot");

console.log(p1);
console.log(p1.name);
p1.speak(); // I'm siotclass이름의 첫 문자는 보통 대문자를 이용한다.- prototype을 베이스로 하는 문법상의 편리함을 제공
new를 이용하여class를 통해 object 를 만들 수 있다.constructor를 이용하여object를 생성하면서 값을 전달할 수 있다.this를 이용해서 만들어진object를 가리킬 수 있다.- 컴파일 옵션
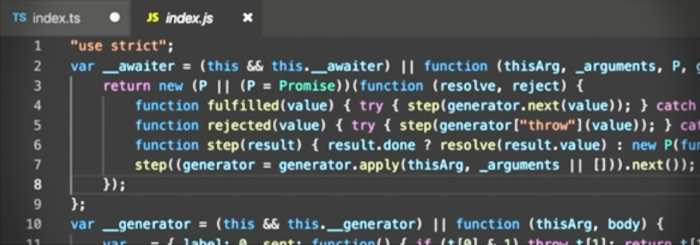
target:ES5의 경우 컴파일되면function으로 변경된다.ES6이후부터는class그대로 변환된다.
constructor & initialize
class속성의 타입을 지정만 하고 초기화하지 않으면(초기값을 할당하지 않으면) 최종적으로 실행되는 타입을 알 수 없음
class Person {
  name: string = "Siot";
  age!: number;
}

const p1 = new Person(); // 생성자를 구현하지 않을 때는 default생성자라 하여 인자를 적지 않는다.)

console.log(p1); // Person {name: "Siot"}
console.log(p1.age); // undefined class초기값 할당
class Person {
  name: string = "siot";
  age: number;

  constructor(age?: number) {
  	if (age === undefined) {
    	this.age = 1;
    } else {
  	this.age = age;
  	}
}

const p1: Person = new Person(99);
const p2: Person = new Person();

console.log(p1);- 생성자 함수가 없으면, 디폴트 생성자가 불린다.
- 프로그래머가 만든 생성자가 하나라도 있으면, 디폴트 생성자는 사라진다.
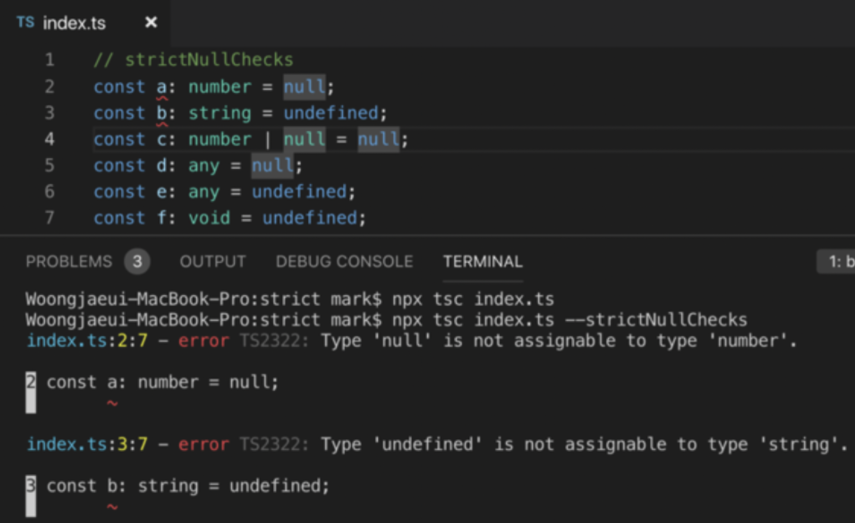
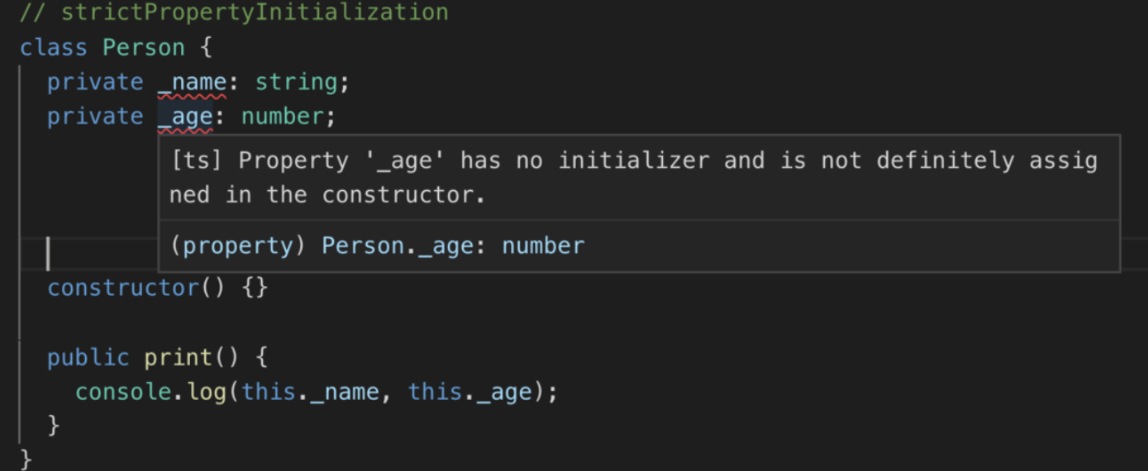
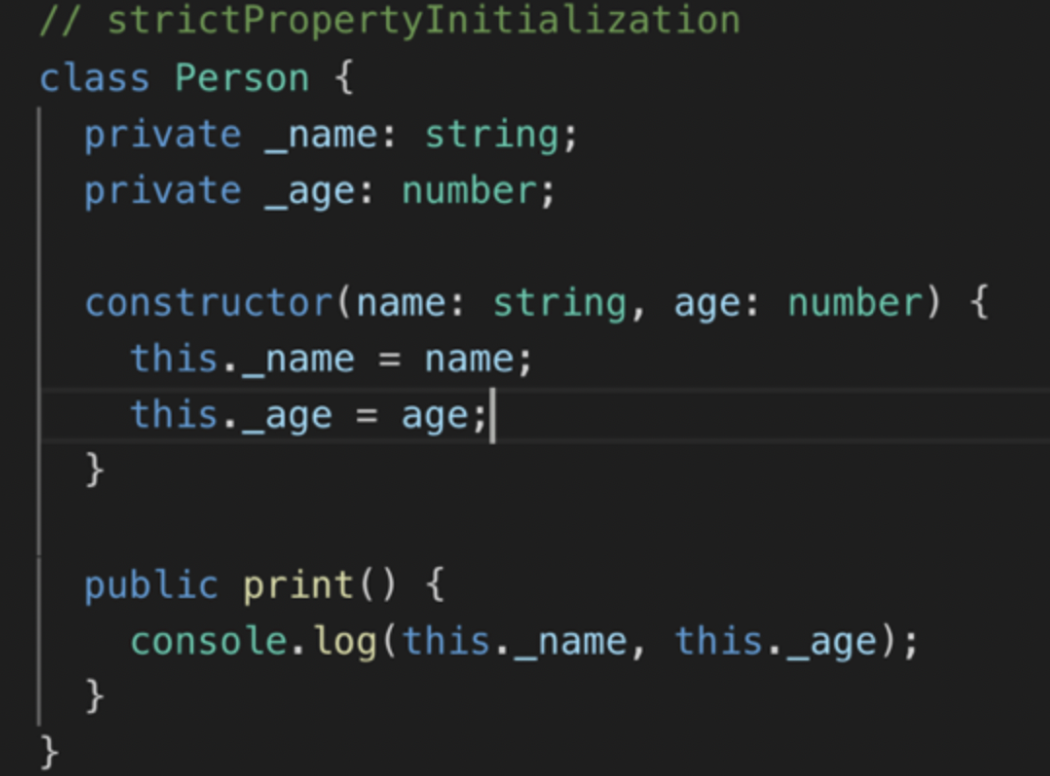
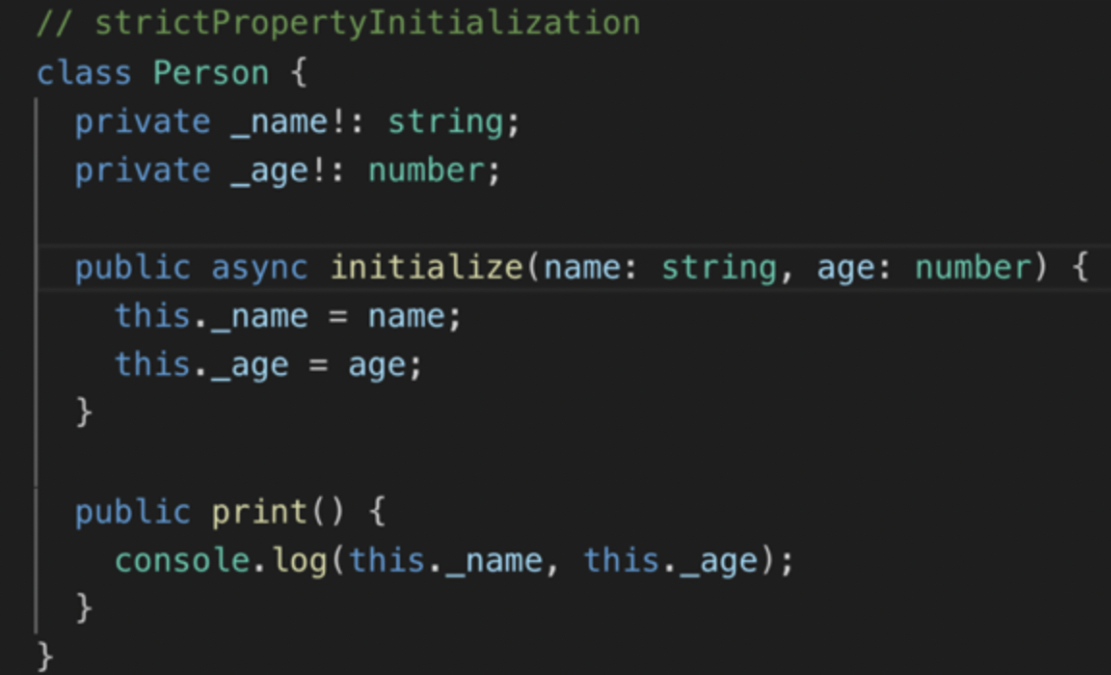
- strict 모드에서는 프로퍼티를 선언하는 곳 또는 생성자에서 값을 할당해야 한다.
- 프로퍼티를 선언하는 곳 또는 생성자에서 값을 할당하지 않는 경우에는 ! 를 붙여서 위험을 표현한다.
- 클래스의 프로퍼티가 정의되어 있지만, 값을 대입하지 않으면
undefined이다. - 생성자에는
async를 설정할 수 없다.
Access Modfiers 접근 제어자
class Person {
  public name: string = "siot";
  private _age: number;
}- typescript 속성, 생성자, 메서드는 접근 제어자를 붙여 외부 혹은 내부에서 접근이 가능하도록 설정할 수 있다.
- 접근 제어자에는
public,private,protected가 있다.class내부의 모든 곳 (프로퍼티, 생성자, 메서드)에서 설정 가능 public: default. 외부에서 접근 가능하도록 설정하는 접근 제어자private: 클래스 외부에서 접근할 수 없다.private을 지원하지 않는 javascript에서는 통상적으로 프로퍼티나 메서드 이름 앞에 _를 붙여 명시적으로 표현해왔다.protected: 외부에서는 불가능하나 상속관계에서는 접근 가능
Initialization in constructor parameters
생성자의 매개변수를 받아 class의 속성으로 초기화
class Person {
  public constructor(public name: string, public age: number) {}
}

const p1: Person = new Person("Siot", 9);
console.log(p1);
중복되는 불필요한 과정과 코드를 제외하고 생성자의 매개변수를 받아서 class의 속성으로 초기화하는 방법
consturctor의 매개변수의 각각의 앞에 접근제어자를 설정할 수 있다.
Getters & Setters📌
class에서 getter와 setter를 활용하는 방법
예제 1
class Person {
  public constructor(public _name: string, public age: number) {}

  get name() {
    console.log('get');
    return this._name + " Mountain";
  }

  set name(n: string) {
    console.log('set');
    this._name = n;
  }
}

const p1: Person = new Person("Siot", 9);
console.log(p1.name); //get 꺼내옴, get을 하는 함수 getter
p1.name = 'kim'; // set 새로운 값을 할당, set을 하는 함수 setter
console.log(p1.name);

// get
// Siot Mountain
// set
// get
// kim Mountain
예제 2
class User {
	constructor(firstName, lastName, age) {
    	this.firstName = firstName;
        this.lastName = lastName;
        this.age = age;
    }

    get age() {
    	return this._age;
    }

    set age() {
    	// if (value < 0) {
        // 	throw Error('age can nt be negative');
        // }
    	this._age = value < 0 ? 0 : value;
    }
}

const user1 = new User('siot', 'kim', -1); //나이를 마이너스로 적는 오류를 범했다면?
console.log(user1.age); // 0, setter에서 값을 바로 잡아줌
🎂 Uncaught RangeError : Maximum call stack size exceeded!
ㄴ _age와 같이 이름을 변경해주는 이유
age라는 getter를 정의하는 순간 this.age는 메모리에 올라가있는 데이터를 읽어오는 것이 아니라 바로 getter를 호출하게 된다. 그리고 setter를 정의하는 순간 this.age에 age값을 할당할 때 바로 메모리에 할당하는 것이 아니라 setter를 호출하게 된다. setter안에서 전달된 value를 this.age에 할당할 때 메모리의 값을 업데이트하는 것이 아니라 setter를 호출하게 된다. setter로 돌아와서 내부 코드는 또다시 setter를 호출하며 무한반복되어 콜스택이 차는 오류가 발생한다. 이것을 방지하기 위해서는 getter와 setter에서 사용하는 변수의 이름을 변경시켜주면 된다. 통상적으로 이름 앞에 언더바를 붙인다.
-> 위 예제에서 field는 firstName, lastName, _age 이지만 .age로 호출할 수 있는 것은 내부적으로 getter와 setter를 이용하기 때문이다.
readonly properties
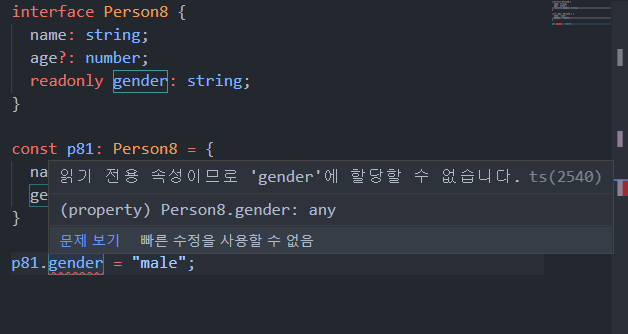
- public + readonly일 경우 외부에서 새로운 값을 할당 할 수 없다.
- private + readonly일 경우 constructor 안에서만 할당 가능하다.
class Person {
  public readonly name: string = 'siot';
  private readonly country: string;

  public constructor(public _name: string, public age: number) {
    this.country = "Korea";
  }

  hello() {
    this.country = "USA" // error
  }
}

const p1: Person = new Person("Siot", 9);
console.log(p1.name);
p1.name = "ieoung";  // error
index Signatures in class
캐릭터 별로 사용가능한 기술들을 묶고 싶을 때 인덱싱해서 동일한 형태로 묶을 수 있음
- 속성이 고정되지 않고 어떤 값이라도 넣을 수 있다.
- index는 초기값을 할당하지 않아도 된다.
// class => object
// {mark: 'male', jade: 'male'}
// {chloe: 'female', alex: 'male', anna: female}

class Students {
 [index: string]: "male" | "female"; //타입 대신 정확한 값을 넣을 수 있음
}

const a = new Students();
a.mark = 'male';
a.jade = 'male';

console.log(a); // Students { mark: 'male', jade: 'male' }

const b = new Students();
b.chloe = 'female';
b.alex = 'male';
b.anna = 'female';

console.log(b); // Students { chloe: 'female', alex: 'male', anna: 'female' }
static properties & methods
들어오는 데이터에 상관없이 공통적으로 쓸 수 있는 곳에는 static를 사용하여 메모리의 사용을 줄일 수 있다.
class Person {
  public static city = "Seoul";
  public static change() {
    Person.city = "Jeju";
  }
}

const p1 = new Person();
p1.hello(); // static을 붙이면 메서드로 인식하지 않음

Person.hello(); //클래스.함수()
Person.city;
class Person을new오브젝트를 만들지 않아도, 클래스로부터 만들어진 객체에서 공통적으로 사용하고 싶은 데이터(속성이나 메서드)에static을 붙이면 공유 가능private을 사용해도 내부에서 클래스.함수( )형식으로 사용 가능- 정적으로 공유되면 값이 변경됨
Singletons 🤦♀️
private과 static으로 알아보는 싱글톤 패턴
앱이 실행되는 중간에 오브젝트로부터 하나의 클래스(instance)만 생성해 사용하는 디자인 패턴이다.
동일한 instance를 반복해서 제공하는 정적 메서드를 만든다.
class ClassName {
	private static instance: ClassName | null = null;
	public static getInstance(): ClassName {
    	// ClassName으로부터 만든 object가 없으면 리턴
        if (ClassName.instace === null) {
        	ClassName.instace = new ClassName();
        }

        return ClassNAme.instace;
    }

	private constructor() {}
}

const a = ClassName.getInstance();
const b = ClassName.getInstance();

console.log(a === b); // true
Inheritance 상속📌
(예제 1)
다양한 도형을 만들 때 class로 정의하려면 어떻게 해야할까?
높이, 너비, 색채 등을 지정할 수 있을 텐데 이들이 반복되어지는 속성! shape을 한 번에 정의하여 재사용할 수 있다.
class Shape {
	constructor(width, height, color) {
    	this.width = width;
        this.height = height;
        this. color = color;
    }

    draw() {
    	console.log(`drawing ${this.color} color!`);
    }

    getArea() {
    	return this.width * this.height;
    }
}

class Rectangle extends Sahpe {}
class Triangle extends Sahpe { // override
	draw() {
    	super.draw(); // override는 덮어씌어지는데 부모그대로 상속받으려면 super
        console.log('⚠');
    }
	getArea() {
    	return (this.width * this.height) / 2;
    }
}

const rectangle = new Rectangle(20, 20, 'blue');
rectangle.draw(); // drawing blue color!
console.log(rectangle.getArea()); // 400
console.log(Triangle.getArea()); // 200
(예제2)
class Parent {
	constructor(protected _name: string, private _age: number) {} // protected 상속관계에서만 접근

	public print(): void {
    	console.log(`이름은 ${this._name}이고 나이는 #{this._age}`);
    }

    protected printName(): void {
    	console.log(this._name, this._age);
    }
}

const p = new Parent("Siot", 99);
p.print();


class Child extends Parent {
	public gender = "male"; // public으로 override(덮어씌우기) 가능

    constructor(age: number) {
    	super("Siot", age); // 생성자 override, 부모 생성자 호출하는 키워드 super는 항상 먼저 작성
        this.printName();
    }
}

const c = new Child(20);
c.print();

// Siot, 20
// 이름은 Siot이고 나이는 20
Abstract classes 🤦♀️
완전하지 않은 클래스를 표현 , 완전하지 않은 클래스는 new로 개체를 표현할 수 없다. 상속과 같은 기능으로 완전하게 만든 후 사용
abstract class AbstractPerson {
	protected _name: string = "Siot";

    abstract setName(name: string): void;
}

// new AbstractPerson()

class Person extends AbstractPerson {
	setName(name: string): void {
    	this._name = name;
    }
}

const p = new Person();
p.setName();
🌍이웅재님, 유튜버 엘리님 강의요약
'FE' 카테고리의 다른 글
| SCSS 컴파일과 문법, 함수 (0) | 2021.11.28 |
|---|---|
| 파이썬으로 텍스트,이미지 크롤링하기 + selenium (0) | 2021.11.27 |
| Interfaces 인터페이스 속성, type alias 타입 별칭, class 클래스 (0) | 2021.11.22 |
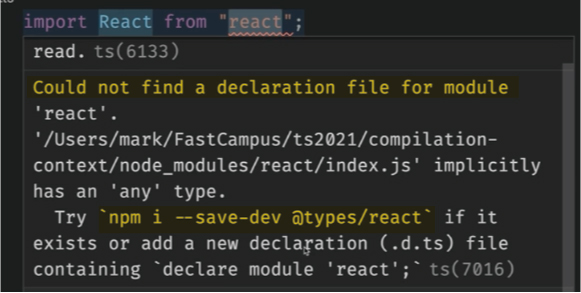
| 컴파일 옵션 CompilerOptions (0) | 2021.11.22 |
| Compilation context 컴파일 옵션, tsconfig 최상위 속성 top level properties (0) | 2021.11.21 |