728x90
728x90

Bootstrap

부트스트랩에서 미리 정의된 components를 불러와 손쉽게 사용


Introduction

Get started with Bootstrap, the world’s most popular framework for building responsive, mobile-first sites, with jsDelivr and a template starter page.

getbootstrap.com


설치방법 1 연동

◽ 프로젝트에 css, js 소스복사 (cdn방식)

<head>
  <link href="https://cdn.jsdelivr.net/npm/bootstrap@5.1.3/dist/css/bootstrap.min.css" rel="stylesheet" integrity="sha384-1BmE4kWBq78iYhFldvKuhfTAU6auU8tT94WrHftjDbrCEXSU1oBoqyl2QvZ6jIW3" crossorigin="anonymous">
  <script src="https://cdn.jsdelivr.net/npm/bootstrap@5.1.3/dist/js/bootstrap.bundle.min.js" integrity="sha384-ka7Sk0Gln4gmtz2MlQnikT1wXgYsOg+OMhuP+IlRH9sENBO0LRn5q+8nbTov4+1p" crossorigin="anonymous"></script>
</head>

link CSS

css 링크코드는 붙여넣기 하면 되고


Script

◽ js에는 두 가지 버전이 있는데 popper의 유무 차이다.

  • Bundle : popper을 번들로 포함한 소스 코드
  • Separate : popper을 포함하지 않은 소스 코드로 popper가 미리 선행되어야 한다.


popper란? 팝업 툴팁 관련 플러그인


Home

Positioning tooltips and popovers is difficult. Popper is here to help! Popper is the de facto standard to position tooltips and popovers in modern web applications.

popper.js.org


설치방법 2 npm📌

필요한 기능만 가져와서 쓸 수 있으며 기본적인 테마를 커스텀하기 좋다.


1. npm 시작, parcel-bundler 패키지 설치

$ npm init -t
$ npm i -D parcel-bundler


//package.json
"scripts": {
  "dev": "parcel index.html",
  "build": "parcel build idnex.html"
}

2. 일반 의존성으로 설치

$ npm install bootstrap

3. npm으로 bootstrap 패키지를 설치했을 때는 (cdn방식)html에 link,script태그를 쓸 필요없이 각각의 js, css파일에서 직접 import하여 사용한다.

3-1. main.js에서 bootstrap모듈을 bundle로 연동 (node_modules폴더로 바로 접근 가능)

import bootstrap from 'bootstrap/dist/js/bootstrap.bundle'

3-2. main.scss에서 bootstrap.scss파일 연동

@import "../node_modules/bootstrap/scss/bootstrap.scss";


Customize


color 예제

bootstrap customize 변수기본값

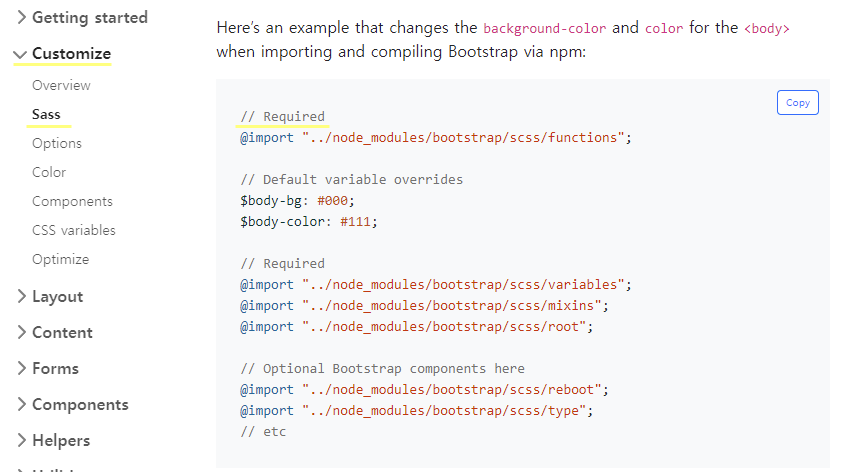
customizing할 때 필수적으로 import할 경로를 최상단에 놓아야 한다. variables에서 데이터를 가져와 $theme-colors에서 덮어스기 override되는 순서다.


Components


class이름만 수정하여도 컴포넌트 스타일을 변경할 수 있다.

Button을 예로 들면

<button type="button" class="btn btn-primary">Primary</button>
<button type="button" class="btn btn-secondary">Secondary</button>
<button type="button" class="btn btn-success">Success</button>

outline추가

<button type="button" class="btn btn-outline-secondary">Secondary</button>

그룹화

  <div class="btn-group">
    <button type="button" class="btn btn-primary">Primary</button>
    <button type="button" class="btn btn-outline-secondary">Secondary</button>
    <button type="button" class="btn btn-success">Success</button>
  </div>


이외에도 form, layout 등 custom하여 사용할 수 있도록 많은 기능을 제공하고 있다.


Tooptips📌


Tooltips are opt-in for performance reasons, so you must initialize them yourself.

툴팁은 성능상의 이유로 제공되지 않으므로 사용자가 초기화해줘야 한다.


단순히 html만 복사할 경우에는

  <button type="button" class="btn btn-secondary" data-bs-toggle="tooltip" data-bs-placement="top" title="Tooltip on top">
    Tooltip on top
  </button>
  <button type="button" class="btn btn-secondary" data-bs-toggle="tooltip" data-bs-placement="right" title="Tooltip on right">
    Tooltip on right
  </button>
  <button type="button" class="btn btn-secondary" data-bs-toggle="tooltip" data-bs-placement="bottom" title="Tooltip on bottom">
    Tooltip on bottom
  </button>
  <button type="button" class="btn btn-secondary" data-bs-toggle="tooltip" data-bs-placement="left" title="Tooltip on left">
    Tooltip on left
  </button>

아래 그림처럼 툴팁이 제대로 작동하지 않는다.

이때 javascript에서 사용자가 초기화를 해줘야 한다. 홈페이지에서 코드 복사

var tooltipTriggerList = [].slice.call(document.querySelectorAll('[data-bs-toggle="tooltip"]'))
var tooltipList = tooltipTriggerList.map(function (tooltipTriggerEl) {
  return new bootstrap.Tooltip(tooltipTriggerEl)
})

js를 연동하면 툴팁이 제대로 나온다.


Optimize

* 성능최적화 : 필요한 기능만 가져와서 쓰기

* 트리 쉐이킹 Tree shaking : 단일 번들을 최적화할 때 사용되는 필요하지 않은 코드를 제거하는 기술


bootstrap이란 이름으로 bundle전체를 가져오는 방식에서 

import bootstrap from 'bootstrap/dist/js/bootstrap.bundle'

필요한 기능(본 포스팅에서는 dropdown, modal)만 즉, 단일 번들을 불러옴으로써 최적화하는 방법이다.

import Dropdown from 'bootstrap/js/dist/dropdown'


dropdown예제


Components > dropdown > via javascript 소스코드를 js에 복붙하여 초기화과정 필요

*초기화가 필요없는 경우도 있음. 해당 컴포넌트의 문서에 별다른 javascript 언급이 없으면 스킵

필요없는 코드나 변수는 정리


modal예제


초기화할 때 주의사항은 js코드 내 사용되어지는 변수명이나 셀렉터명을 확실히 연결해야 한다.

이 과정에서 모달은 옵션추가도 가능한데 backdrop: 'static'옵션은 바깥부분을 클릭해도 창이 꺼지지 않게 하는 옵션이다.

import Modal from 'bootstrap/js/dist/modal'
new Modal(document.querySelector('#exampleModal'), {
  backdrop: 'static'
})


popper 에러


최적화 하는 과정에서 popper에러가 뜰 수 있다. 부트캠프는 popper를 번들로 설치되어지는데 단일 번들만 가져와 최적화할 경우에는 popper가 정상적으로 불러와지지 않기 때문이다.

popper를 설치하면 문제 해결

$ npm i @popperjs/core


728x90

'FE' 카테고리의 다른 글

번들러 webpack 플러그인 사용법  (0) 2021.12.05
번들러 parcel 플러그인 사용법  (0) 2021.11.29
git the requested URL returend error : 403  (0) 2021.11.28
goorm IDE  (0) 2021.11.28
SCSS 컴파일과 문법, 함수  (0) 2021.11.28
728x90
 

깃 푸쉬 권한 거부

거절은 거절하고 싶은데 잘 되던 깃 푸쉬가 안 되니까 30분동안 키보드만 푸쉬하여 알아낸 결과,


🤦‍♀️발생 시점

vs code에서 git push를 했지만 

해당 레포지토리를 찾을 수 없다, 이미 레포지토리가 존재한다, 요청이 반환되었다 등의 에러를 발견


🚨에러 후 팝업

브라우저 혹은 토큰으로 인증하라는 새 창이 뜸, 맥에서 쉘 변경으로 인한 권한 거부로 이러한 인증메세지를 본 적이 있어 토큰을 이용해 넘어가려 했지만 토큰인증을 3번 함에도 여전히 403에러 (현재는 윈도우)


👍해결방법

$ git remote set-url origin https://유저이름@github.com/유저이름/레포지토리이름.git
$ git push origin 브랜치


git urL 요청을 거절당했기 때문에 url을 조금 다르게 세팅하여 push를 하면 인증창이 뜬다. 여기서 토큰인증을 3번 받았는데 모두 403error로 다시 돌아왔고 4번째에는 브라우저로 권한허용하였더니 그제서야 원격저장이 완료되었다.

실제로 원격저장은 30분전에 완료된 상태였고 git에서만 확인되지 않은 상태였다. 단순히 원격저장소로 옮겨지지 않은 것이 아닌 권한만 거부되었던 상황인 것으로 보인다. 이유는...모름 해결법만 알게 됨

728x90

'FE' 카테고리의 다른 글

번들러 parcel 플러그인 사용법  (0) 2021.11.29
Bootstrap 부트스트랩 UI 프레임워크  (0) 2021.11.28
goorm IDE  (0) 2021.11.28
SCSS 컴파일과 문법, 함수  (0) 2021.11.28
파이썬으로 텍스트,이미지 크롤링하기 + selenium  (0) 2021.11.27
728x90


구름IDE - 설치가 필요없는 통합개발환경 서비스

구름IDE는 언제 어디서나 사용 가능한 클라우드 통합개발환경(Integrated Development Environment IDE)을 제공합니다. 웹브라우저만 있으면 코딩, 디버그, 컴파일, 배포 등 개발에 관련된 모든 작업을 클라

ide.goorm.io

goorm IDE

복잡한 로컬환경을 만들 필요없이 가상환경을 만들어 개발할 수 있는 사이트

필요한 언어나 라이브러리를 따로 설치할 필요가 없고 컨테이너마다 필요한 도구를 선택하기만 하면 가상으로 개발환경이 만들어진다.


*IDE Intergrated Development Environment : 통합 개발 환경

코딩, 디버그, 컴파일, 배포 등 프로그램 개발에 관련된 모든 작업을 하나의 프로그램 안에서 처리하는 환경을 제공하는 소프트웨어


컨테이너


새 컨테이너 생성하기


컨테이너 실행


728x90
728x90
 

Sass

Syntactically Awesome Style Sheets

CSS를 쉽게 사용하기 위한 도구, CSS 전처리기


Sass-lang


Sass: Syntactically Awesome Style Sheets

Sass is the most mature, stable, and powerful professional grade CSS extension language in the world.

sass-lang.com


Sass와 SCSS의 차이점


  • Sass는 Sass와 SCSS 두 가지 문법을 지원하고, SCSS는 기존의 Sass의 단점을 보완해 만들어졌다.
  • Sass는 표준css와 호환이 잘 되지 않고, 브레이스나 세미콜론을 사용하지 않는 차이가 있다.
  • 유일하게 Mixins에서 @, =, + 등 사용하는 기호의 차이가 있다.


SCSS의 특징


  • 상속되는 선택자를 계층적으로 명시하여 불필요한 반복적 사용을 줄일 수 있다.
  • typescript와 마찬가지로 컴파일, 즉 CSS전처리기를 통해 SCSS의 문법을 CSS로 변환해준다.
  • 전처리기로 sass이외에 less와 stylus도 있다.


컴파일


parcel bundler 패키지에서 자동으로 scss를 체크하여 컴파일

$color: blue;

.container {
	h1 {
    	color: $color;
    }
}


🌲 SCSS 문법


참고 사이트

1. Codepen에서 SCSS사용법

1-1. codepen에서 SCSS 사용하기

CSS Preprocessor 전처리기에서 SCSS로 설정

1-2. codepen에서 SCSS 컴파일 미리보기


2. Sassmeister

Sassmeister : SCSS와 변환된 CSS를 동시에 확인할 수 있는 사이트


SassMeister | The Sass Playground!

SassMeister: The sassiest way to play with Sass, Compass, & LibSass! Loading...

www.sassmeister.com


SCSS에서의 주석


2가지 방법으로 사용할 수 있으나 //는 컴파일 시 CSS에서 내용이 삭제됨을 주의

.container {
  h1 {
    color: blue;
    // font-size: 12px;
    /* background-color: yellow; */
  }
}


✅ 자식 선택자 >


.container {
  > h1 {
      color: blue;
  }
}


✅ 상위 선택자 참조 &


상위선택자로 치환(참조)한다는 의미다.

예제 1

.btn {
	position: absolute;
	&.active {
		color: red;
	}
}
.btn { position: absolute; }
.btn.active { color: red; }

예제 2

.fs {
    &-small { font-size: 12px; }
    &-medium { font-size: 14px; }
    &-large { font-size: 16px; }
}
.fs-small { font-size: 12px; }
.fs-medium { font-size: 14px; }
.fs-large { font-size: 16px; }


✅ 중첩된 속성


네임스페이스가 동일한 속성은 다음과 같이 표현할 수 있다. 콜론과 세미콜론을 활용한다.

*namespace: 이름을 통해 구분 가능한 범위를 만들어내는 것, 일종의 유효범위를 지정하는 방법

.box {
    font: {
    	size: 10px;
        weight: bold;
    }
    margin: {
    	top: 10px;
        bottom: 12px;
    }
}
.box {
    font-size: 10px;
    font-weight: bold;
    margin-top: 10px;
    margin-bottom: 12px;
}


✅ 변수 Variables


  • 반복되는 동일한 내용을 변수로 만들면 수정 시 용이하다.
  • 변수에는 유효범위가 있다.
$size: 100px; // 전역에서 사용 가능한 변수

.container {
  $size: 100px; // 선언된 중괄호 범위 내에서만 사용 가능
  position: fixed;
  top: $size; // 100
  .item {
    $size: 200px; // 변수 변경
    width: $size; // 200
    height: $size; // 200
    transform: translateX($size); // 200
  }
  .it {
      width: $size; 200
  }
  left: $size; // ★200
}


✅ 산술연산자


1. SCSS에서도 연산자(-, +, /, *, %)를 사용 가능하다.

2. 나누기의 슬래시 기호는 단축속성으로 인식될 수 있기 때문에 그대로 사용하지 않는다.

  ㄴ괄호 안에 넣어서 사용한다. (20/4)

  ㄴ변수에 값을 할당해 사용해야 한다. $size: 20

  ㄴ다른 산술연산자와 같이 사용할 경우에도 제대로 작동한다. (3 + 9) / 2

3. calc함수를 사용하면 서로 다른 단위도 계산 가능하다 calc(100% - 200px)


💻 Mixins 재활용

변수와 다르게 여러 속성을 담아 사용


mixin 사용법

@mixin 이름에 넣은 후 @include 이름 으로 가져온다.

@mixin center {
    display: flex;
    justify-content: center;
    align-items: center;
}

.container {
    @include center;
    .item {
        @include center;
    }
}


mixin에서 인수를 활용해 값을 쉽게 변경하는 방법

1. @mixin 이름($인수명: 기본값) : 기본값을 설정해 인수를 적지않아도 기본값으로 출력 가능

2. @mixin 이름($인수명: 기본값, $인수명: 기본값) : 콤마를 이용해 인수를 여러 개 지정 가능 

3. mixin의 인수는 기본적으로 순서대로 인덱싱되기 때문에 두번째 인수만 변경하기 위해서는 키워드인수 문법을 이용해야 한다. $color: green

@mixin box($size: 100px, $color: blue) {
    width: $size;
    height: $size;
    background-color: $color;
}
.container {
    @include box(200px, orange);
    .item {
        @include box($color: green); // 키워드인수
    } 
}


💻 함수


mixin은 단순히 속성들의 모임이지만 함수는 새로운 연산을 반환해 사용

-> 화면 비율을 16:9로 계산하도록 함수 ratio를 만들어 적용

@mixin center {
    display: flex;
    justify-content: center;
    align-items: center;
}

@function ratio($size, $ratio) {
    @return $size * $ratio
}

.box {
    $width:100px;
    width: $width;
    height: ratio($width, 9/16);
    @include center;
}
.box {
  width: 100px;
  height: 56.25px; // 함수로 생성된 값
  display: flex;
  justify-content: center;
  align-items: center;
}


💻 반복문


for문에서는 문자 보간 방법을 사용 #{ }


SCSS

// for (let i = 0; i < 10; i += 1) {
//     console.log(`loop-${i}`)
// }


@for $i from 1 through 4 {
    .box:nth-child(#{$i}) { // 보간
        width: 100px * $i;
    }
}

CSS

.box:nth-child(1) {
  width: 100px;
}

.box:nth-child(2) {
  width: 200px;
}

.box:nth-child(3) {
  width: 300px;
}

.box:nth-child(4) {
  width: 400px;
}


💻 SCSS 내장함수

컬러 관련 (별도의 선언없이 사용할 수 있는) SCSS 내장함수


mix($color, yellow) 

두 가지 컬러를 혼합


lighten

lighten($color, 10%)


darken

darken($color, 10%) : hover할 때 약간의 색변화를 주는 용도로 활용 가능

hover


saturate, desaturate

saturate($color, 40%)

desaturate($color, 40%)


grayscale, invert

grayscale($color) 현재 색을 그레이톤으로

invert($color) 현재 색을 인버트


rgba

rgba($color, .5) 


✅ SCSS파일 불러오기


1. url함수 이용 @import url("./sub.scss");

2. url함수 없이 경로만 @import "./sub.scss";

3. scss 확장자 생략 가능 @import "./sub";

4. 여러 개의 경로 불러오기 @import "./sub", "./sub2";


많이 사용하진 않지만 알아두면 유용한


⛔데이터 종류

데이터 예시 설명
number .5, 100px, 1em 숫자
string bold, relative, "../images/a.png" 문자
color red, #000, rgba(0,0,0, .5) 색상
boolean true, flase 논리
null null 아무것도 없음, 속성값이 null이면 컴파일되지 않음
list red, orange, yellow; 공백 또는 쉼표로 구분된 값의 목록
map ( r: red, o: orange, y: yellow ); key:value형태의 묶음


⛔ 반복문 @each

반복문 @each로 list와 map 활용하기 


@each $A in $B : B변수 내 해당 데이터를 반복적으로 A변수에 넣어 처리


SCSS

$list: red, orange, yellow;
$map: ( r: red, o: orange, y: yellow );

@each $c in $list {
    .box {
        color: $c;
    }
}

@each $k, $v in $map {
    .box-#{$k} {
        color: $v;
    }
}

CSS

.box {
  color: red;
}

.box {
  color: orange;
}

.box {
  color: yellow;
}

.box-r {
  color: red;
}

.box-o {
  color: orange;
}

.box-y {
  color: yellow;
}


⛔ 재활용 @content


@content가 삽입된 자리에 코드 추가


SCSS

@mixin left-top {
    position: absolute;
    top: 0;
    left: 0;
    @content;
}

.box {
    @include left-top {
        bottom: 0;
    }
}

CSS

.box {
  position: absolute;
  top: 0;
  left: 0;
  bottom: 0;
}
728x90
728x90

1. 파이썬 개발 환경 설정

- 구름IDE

2. 위키피디아 크롤링

3. 셀레니움으로 구글 이미지 크롤링


IDE


ㄴ IDE로 편하게 연습하기


goorm

구름은 클라우드 기술을 이용하여 누구나 코딩을 배우고, 실력을 평가하고, 소프트웨어를 개발할 수 있는 클라우드 소프트웨어 생태계입니다.

www.goorm.io


크롤링 예제


위키피디아 링크만 크롤링


파이썬 라이브러리 beautiful soup 위키피디아(링크)에 있는 예제코드

https://en.wikipedia.org/wiki/Main_Page 에 있는 a 태그를 크롤링하는 코드

from bs4 import BeautifulSoup
from urllib.request import urlopen
with urlopen('https://en.wikipedia.org/wiki/Main_Page') as response:
    soup = BeautifulSoup(response, 'html.parser')
    for anchor in soup.find_all('a'):
        print(anchor.get('href', '/'))


파일 읽고 쓰기


크롤링하여 터미널에서 읽히는 텍스트를 txt파일로 쓰기


04-3 파일 읽고 쓰기

우리는 이 책에서 이제까지 값을

wikidocs.net

f = open("C:/doit/새파일.txt", 'w')
for i in range(1, 11):
    data = "%d번째 줄입니다.\n" % i
    f.write(data)
f.close()


셀레니움 이미지 크롤링


💻 Selenium 프레임워크

크롤링, 메일보내기 등 브라우저에서 작용하는 것들을 자동화할 수 있는 프레임워크


1. 파이썬 가상환경 만들기 venv


venv — 가상 환경 생성 — Python 3.10.0 문서

venv — 가상 환경 생성 소스 코드: Lib/venv/ venv 모듈은 자체 사이트 디렉터리를 갖는 경량 《가상 환경》을 만들고, 선택적으로 시스템 사이트 디렉터리에서 격리할 수 있도록 지원합니다. 각 가

docs.python.org

현재 경로에 selenium이라는 이름으로 가상환경을 만든다.

$ python -m venv selenium

selenium폴더 안에 scripts로 이동하여 activate(활성화)해주면

$ cd selenium\scripts
$ ./activate

터미널 앞쪽에 (selenium)키워드가 생성된다.

-> selenium이라는 가상환경에 들어옴을 알려주는 표시


2. selenium설치

scripts폴더 내에 설치

$ python -m pip install selenium


3. 브라우저 세팅

chromedriver를 다운로드 받은 후 selenium폴더 내에 가져오기 -> 같은 위치에 google.py파일 생성


3. 구글 이미지 크롤링하기

selenium 예제코드에서부터 하나씩 붙여나가는 연습


2. Getting Started — Selenium Python Bindings 2 documentation

2.2. Example Explained The selenium.webdriver module provides all the WebDriver implementations. Currently supported WebDriver implementations are Firefox, Chrome, IE and Remote. The Keys class provide keys in the keyboard like RETURN, F1, ALT etc. from se

selenium-python.readthedocs.io

from selenium import webdriver
from selenium.webdriver.common.keys import Keys

driver = webdriver.Firefox()
driver.get("http://www.python.org")
assert "Python" in driver.title
elem = driver.find_element_by_name("q")
elem.clear()
elem.send_keys("pycon")
elem.send_keys(Keys.RETURN)
assert "No results found." not in driver.page_source
driver.close()


구글에서 apple을 검색한 후 차례대로 이미지를 다운로드받기 📌

from selenium import webdriver
from selenium.webdriver.common.keys import Keys
import time #클릭후 이미지로딩 기다리기
import urllib.request

driver = webdriver.Chrome()
driver.get("https://www.google.co.kr/imghp?hl=ko&ogbl")
elem = driver.find_element_by_name("q") #검색창 name으로 찾기
elem.send_keys("apple") #키워드 설정
elem.send_keys(Keys.RETURN) # 엔터
images = driver.find_elements_by_css_selector(".rg_i.Q4LuWd")
count = 1
for image in images:
  image.click() # 클래스 찾아 클릭
  time.sleep(3)
  imgUrl = driver.find_element_by_css_selector(".n3VNCb").get_attribute("src")
  #이미지주소 src 다운로드
  urllib.request.urlretrieve(imgUrl, str(count) + ".jpg")
  count = count + 1


python 명령어


$ python index.py // index파일 실행
$ pip install 패키지명 // 패키지 설치

*pip package installer for Python

파이썬(python)으로 작성된 패키지 소프트웨어를 설치 · 관리하는 패키지 관리 시스템


🌲유튜버 조코딩님 강의를 바탕으로 정리한 내용


728x90
+ Recent posts
728x90