728x90
728x90

Contents

💻 VSCode에서 버전관리 시작하기

💻 로컬 환경, 원격저장소, 새로운 컴퓨터 환경에서 버전관리 하는 방법

 ㄴ branch 개념, 생성, 삭제, 병합

 ㄴ github clone, pull, push

 ㄴ commit 버전 생성, 리셋

💻 Github깃헙과 Netlify네트리파이 연동하기


master(branch) - stage(변경사항  추적 중) - local(git 사용자) - GitHub 원격(remote) > repository(저장소)


🚨 VCS(Version Control System) 버전 관리 

📍 VSCode Git 명령어


  명령어 설명  
📂시작하기
git --version 버전 확인 *플래그(--, -) : 앞의 옵션의 세부적인 옵션
git init 현재 프로젝트에서 변경사항 추적 (버전 관리)을 시작  
git config --global core.autocrlf input 개행 문자(NewLine) 설정 *global : 전역 옵션으로 전체영역을 의미
📂사용자 정보 git config --global user.name "이름" 이름 등록 *Commit(버전 생성)을 위한 정보 등록
git config --global user.email "e-mail" e-mail 등록
git config --global --list 구성 확인  
📂버전 관리 git status 버전 현재 상태  
git add .   모든 파일의 변경사항 추적  
 ㄴ git add index.html 변경사항을 추적할 특정 파일 지정  
git commit -m '버전 이름' 메시지(-m)와 함께 버전 생성  
git log commit에서 등록한 버전 확인 *head->master : 최신
git reset --hard HEAD~1 최신에서 1이전 버전으로 되돌리기  
git reset --hard ORIG_HEAD 원상복귀  
📂원격저장소 git remote add origin 저장소주소 origin이란 별칭으로 원격저장소 연결 *origin : 별칭(다른 이름도 가능하나 통상적으로 사용) 
git push origin master 원격저장소origin > branch master에 버전 내역 전송(push)  
git pull origin master 원격저장소에서 로컬로 당겨오기  
📂branch git branch 로컬의 branch 목록  
git branch -r 원격저장소에 있는 branch 목록  
git branch yellow 새로운 branch 생성  
git checkout master branch 변경하기  
 ㄴ git checkout -t origin/purple 원격소에서 특정 branch 가져오기  
 ㄴ git checkout -b yellow 새로운 branch 생성+변경 동시에  
git branch -d purple (로컬에서) 필요없는 branch 삭제 *다른 branch에서 시도
📂새로운 환경


ls 디렉토리 목록 *윈도우는 dir
cd Desktop 특정 경로로 저장경로 선택 *cd : change directory
git clone 주소 지정한 경로로 파일 복제  
code . 폴더를 VSCode 새창으로 불러오기  
code . -r 폴더를 현재 VSCode창에 불러오기  

*README.md의 md : markdown

*m : modified 수정된 파일

*u : untracked file 새로운 파일 작성


🚨 Github에서 branch 병합하기

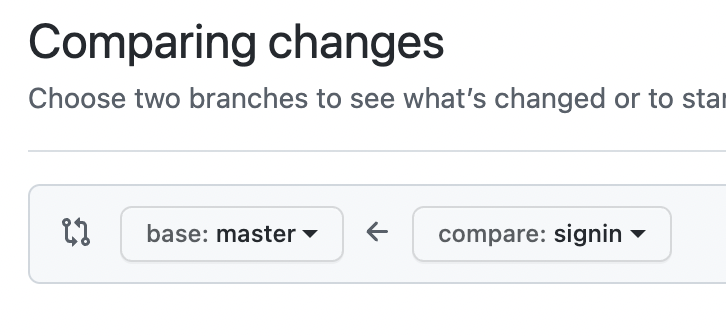
📍 Pull requests > New pull request

📍 base: master <- compare:signin

compare가 수정된 branch

즉, master에 signin을 병합하겠다는 뜻


🚨 Github로 Push할 때! (2021년 8월 이후 변경사항)

📍 비밀번호가 아닌 개인 token을 이용

*How to create a personal access token (깃헙에서 개인용 토큰 설정하는 법)


Creating a personal access token - GitHub Docs

You should create a personal access token to use in place of a password with the command line or with the API.

docs.github.com


🚨 VCS(Version Control System) 버전 관리가 필요한 이유

📍 로컬 버전 -> 중앙집중식 버전 -> 분산 버전 관리로

DVCS(분산 버전 관리 시스템)은 Git과 같은 시스템인데 히스토리와 함께 저장소가 저장된다. 서버에 문제가 발생해도 클라이언트에서 복제해 모든 데이터를 가져올 수 있다. 수많은 원격 저장소를 만들 수 있으며 협업에 용이하다.


📍 Git에서 버전 관리하기

수많은 코드와 수많은 개발자들이 거쳐가는 파일을 시간에 따라 기록한다. 특정 시점의 버전을 다시 꺼내올 수도 꺼내와서 수정 및 추가할 수도 있다. 원격 저장소와 새로운 로컬 환경을 넘나들며 관리할 수 있는 장점이 있다. 버전 등록 시점과 문제점의 시발을 추적할 수도 있다. 수정된 내용을 비교하거나 파일 복구, 충돌에 의한 문제점에 있어서도 이점이 있다. 즉, 변경 이력과 수정 내용을 관리하기 쉽다.


🚨 Netlify 네트리파이

Continuous Deployment (지속적인 배포) : 깃헙 저장소에 커밋되면 네트리파이의 사이트도 자동으로 업데이트


Netlify App


app.netlify.com

728x90
728x90


🚨 ⓒ2021 : 저작권연도 표기

📍 올해 연도 자동 계산 함수

   ㄴ textContent / Date()

const thisYear = document.querySelector('.this-year');
thisYear.textContent = new Date().getFullYear(); //2021 // textContent : 글자 값을 알아내거나 지정하는


📍 ⓒ저작권 (특수문자) 넣는 방법 Html Entities


Character Entity Reference Chart


dev.w3.org


🚨 ScrollTo 페이지 상단으로 이동 gsap 라이브러리📌

기존에 Badge만들었던 window 이벤트 _.throttle함수에 함께 작성


gsap - Libraries - cdnjs - The #1 free and open source CDN built to make life easier for developers

GSAP is a JavaScript library for building high-performance animations that work in **every** major browser. Animate CSS, SVG, canvas, React, Vue, WebGL, colors, strings, motion paths, generic objects...anything JavaScript can touch! No other library delive

cdnjs.com


 <div id="to-top">
   <div class="material-icons">arrow_upward</div>
 </div>
/* ScrollTO */
#to-top {
  width:42px;
  height: 42px;
  background-color: #333;
  color: #fff;
  border: 2px solid #fff;
  border-radius: 10px;
  cursor: pointer;
  display: flex;
  justify-content: center;
  align-items: center;
  position: fixed;
  bottom: 30px;
  right: 30px;
  z-index: 9;
}
// 배지
const badgeEl = document.querySelector('header .badges');
const toTopEl = document.querySelector('#to-top');

window.addEventListener('scroll', _.throttle(function () {
  console.log(window.scrollY);
  if (window.scrollY > 500) {
    // 배지 숨기기
    gsap.to(badgeEl, .6, {
      opacity: 0,
      display: 'none'
    });
    // 버튼 보이기!
    gsap.to(toTopEl, .2, {
      x: 0
    });
  } else {
    // 배지 보이기
    gsap.to(badgeEl, .6, {
      opacity: 1,
      display: 'block'
    });
    // 버튼 숨기기!
    gsap.to(toTopEl, .2, {
      x: 100
    });
  }
}, 300));

// _.throttle(함수, 시간)

toTopEl.addEventListener('click', function () {
  gsap.to(window, .7, {
    scrollTo: 0
  });
});


👩‍💻 완성 코드


<!-- FOOTER -->
 <footer>

  <div class="inner">

    <ul class="menu">
      <li><a href="javascript:void(0)" class="green">개인정보처리방침</a></li>
      <li><a href="javascript:void(0)">영상정보처리기기 운영관리 방침</a></li>
      <li><a href="javascript:void(0)">홈페이지 이용약관</a></li>
      <li><a href="javascript:void(0)">위치정보 이용약관</a></li>
      <li><a href="javascript:void(0)">스타벅스 카드 이용약관</a></li>
      <li><a href="javascript:void(0)">윤리경영 핫라인</a></li>
    </ul>

    <div class="btn-group">
      <a href="javascript:void(0)" class="btn btn--white">찾아오시는 길</a>
      <a href="javascript:void(0)" class="btn btn--white">신규입점제의</a>
      <a href="javascript:void(0)" class="btn btn--white">사이트 맵</a>
    </div>

    <div class="info">
      <span>사업자등록번호 : 201-81-21515</span>
      <span>(주)스타벅스커피 코리아 대표이사 : 송 데이비드 호섭</span>
      <span>TEL : 1522-3232</span>
      <span>개인정보 책임자 : 하익성</span>
    </div>

    <p class="copyright">
      &copy; <span class="this-year"></span> Starbucks Coffee Company. All Rights Reserved.
    </p>
    <img src="./images/starbucks_logo_only_text.png" alt="logo" class="logo">

  </div>

 </footer>
footer {  background-color: #272727;  border-top: 1px solid #333;}
footer .inner {  padding:40px 0 60px 0;}
footer .menu {  display: flex;  justify-content: center;}
footer .menu li {  position: relative;}
footer .menu li::before {  content: "";  /* display: block; */  width: 3px;  height: 3px;    background-color: #555;  position: absolute;    top:0;  bottom: 0;  margin: auto;  right:-1px;}
footer .menu li:last-child::before{  display: none;} 
footer .menu li a {    color: #ccc;  font-size: 12px;  font-weight: 700; padding: 15px;  display: block;}
footer .menu li a.green {  color: #669900}
footer .menu li:hover a {text-decoration: underline;}

footer .btn-group {  margin-top: 20px;  display: flex;  justify-content: center;}
footer .btn-group .btn {  font-size: 12px;  margin-right: 10px;}
footer .btn-group .btn:last-child {  margin-right: 0;}

footer .info {  margin-top: 30px;  text-align: center;}
footer .info span {  margin-right: 20px;  color: #999;  font-size:12px;}
footer .info span:last-child {  margin-right:0;}
footer .copyright {  color: #999;  font-size: 12px;  text-align: center;  margin-top: 12px;}
footer .logo {  margin: 30px auto 0;  }
728x90
728x90

1. Swiper를 이용하여 다섯개의 요소가 한 화면에 보이도록 배치


2. Swiper를 제어하는 prev, next 버튼 만들기


1. Swiper를 이용하여 다섯개의 요소가 한 화면에 보이도록 배치

<!-- AWARDS -->
 <section class="awards">
  <div class="inner">

    <div class="swiper-container">
      <div class="swiper-wrapper">
        <div class="swiper-slide">
          <img src="./images/awards_slide1.jpg" alt="" />
        </div>
        <div class="swiper-slide">
          <img src="./images/awards_slide2.jpg" alt="" />
        </div>
        <div class="swiper-slide">
          <img src="./images/awards_slide3.jpg" alt="" />
        </div>
        <div class="swiper-slide">
          <img src="./images/awards_slide4.jpg" alt="" />
        </div>
        <div class="swiper-slide">
          <img src="./images/awards_slide5.jpg" alt="" />
        </div>
        <div class="swiper-slide">
          <img src="./images/awards_slide6.jpg" alt="" />
        </div>
        <div class="swiper-slide">
          <img src="./images/awards_slide7.jpg" alt="" />
        </div>
        <div class="swiper-slide">
          <img src="./images/awards_slide8.jpg" alt="" />
        </div>
        <div class="swiper-slide">
          <img src="./images/awards_slide9.jpg" alt="" />
        </div>
        <div class="swiper-slide">
          <img src="./images/awards_slide10.jpg" alt="" />
        </div>
      </div>
    </div>
    <div class="swiper-prev">
      <div class="material-icons">arrow_back</div>
    </div>
    <div class="swiper-next">
      <div class="material-icons">arrow_forward</div>
    </div>

  </div>
 </section>
new Swiper('.awards .swiper-container', {
  slidesPerView: 5, // 한번에 보이는 개수
  spaceBetween: 30, // 요소 간 간격 (px)
  autoplay: true,
  loop: true,
  navigation: {
    prevEl: '.awards .swiper-prev',
    nextEl: '.awards .swiper-next'
  }
});


2. Swiper를 제어하는 prev, next 버튼 만들기

- css에서 style과 위치를 지정해줘야 함

/* AWARDS */
.awards {
  background-color: #272727;
}
.awards .inner {
  padding: 40px 0;
}
.awards .swiper-container {
  width: 100%;
  height: 40px;
}
.awards .swiper-prev,
.awards .swiper-next {
  width: 42px;
  height: 42px;
  border-radius: 50%;
  border: 2px solid #fff;
  outline: none;
  opacity: .3;
  cursor: pointer;
  color: #fff;
  display: flex;
  justify-content: center;
  align-items: center;
  position: absolute;
  top:0;
  bottom: 0;
  margin: auto;
}
.awards .swiper-prev:hover,
.awards .swiper-next:hover {
  color: #333;
  background-color: #fff;
}
.awards .swiper-prev {
  left: -100px;
}
.awards .swiper-next {
  right: -100px;
}
728x90
728x90

1. ScrollMagic 라이브러리

2. CSS에서 선택자 스타일

- opacity, transform, translateX, transition-delay

3. HTML에 수동으로 클래스 추가


🚨 ScrollMagic 라이브러리 📌📌📌


ScrollMagic - Libraries - cdnjs - The #1 free and open source CDN built to make life easier for developers

The javascript library for magical scroll interactions. - Simple. Fast. Reliable. Content delivery at its finest. cdnjs is a free and open-source CDN service trusted by over 12.5% of all websites, serving over 200 billion requests each month, powered by Cl

cdnjs.com


📍 상수 spyEls <- section태그이면서 클래스명 scroll-spy를 갖는 모든 선택자


📍 forEach()메소드에서 메소드 체이닝으로 함수 불러오기

 ㄴ new라는 키워드를 이용하여 ScrollMagic 라이브러리를 실행 (생성자 함수)

 ㄴ Scene() : 감시하는 메소드 (첫문자 대문자)

 ㄴ setClassToggle() : 클래스 속성 지정, 제어하는 메소드

 ㄴ addTo() : 컨트롤하는 메소드

spyEls.forEach(function (spyEl) {
	new ScrollMagic.Scene().setClassToggle().addTo(); //메소드 체이닝으로 함수 불러오기
});
// ScrollMagic

const spyEls = document.querySelectorAll('section.scroll-spy');
spyEls.forEach(function (spyEl) {
   new ScrollMagic //메소드 체이닝으로 함수 불러오기
    .Scene({
      triggerElement: spyEl, // 보여짐의 여부를 감시할 요소
      triggerHook: .8 // 뷰포트 높이의 0~1사이 
    })
    .setClassToggle(spyEl, 'show') // 클래스명 show생성
    .addTo(new ScrollMagic.Controller()); 
});


📍  CSS

opacity, transform, translateX, transition-delay

html에서 필요한 부분에 해당 class를 수동으로 추가

.back-to-position {  opacity: 0;  transition: 1s;}

.back-to-position.to-right {  transform: translateX(-150px);}
.back-to-position.to-left {  transform: translateX(150px);}

.show .back-to-position {  opacity:1;  transform: translateX(0);}

.show .back-to-position.delay-0 {  transition-delay: 0s;}
.show .back-to-position.delay-1 {  transition-delay: .3s;}
.show .back-to-position.delay-2 {  transition-delay: .6s;}
.show .back-to-position.delay-3 {  transition-delay: .9s;}


728x90
728x90


border-radius: 00%;
box-shadow: x축 y축 그림자블러 색상투명도;


<!-- STORE -->
 <section class="find-store">

  <div class="inner">
    <img src="./images/find_store_texture1.png" alt="" class="texture1" />
    <img src="./images/find_store_texture2.png" alt="" class="texture2" />
    <img src="./images/find_store_picture1.jpg" alt="" class="picture picture1" />
    <img src="./images/find_store_picture2.jpg" alt="" class="picture picture2" />
    <div class="text-group">
      <img src="./images/find_store_text1.png" alt="" class="title">
      <img src="./images/find_store_text2.png" alt="" class="description">
      <div class="more">
        <a href="javascript:void(0)" class="btn">자세히 보기</a>
      </div>
    </div>

  </div>

 </section>
/* FIND STORE */
.find-store {
  background-image: url("../images/find_store_bg.jpg");
}

.find-store .inner {
  height: 400px;
}

.find-store .texture1 {
  position: absolute;
  top: 0;
  left: 400px;
}

.find-store .texture2 {
  position: absolute;
  bottom: 0;
  right: 0;
}

.find-store .picture {
  border-radius: 50%;
  box-shadow: 2px 2px 8px rgba(0,0,0,0.3);
}

.find-store .picture1 {
  position: absolute;
  top: -60px;
  left: 0;
}

.find-store .picture2 {
  position: absolute;
  top: 150px;
  left: 250px;
}

.find-store .text-group {
  position: absolute;
  top: 120px;
  left: 550px;
}

.find-store .text-group .title {
  margin-bottom: 20px;
}

.find-store .text-group .description {
  margin-bottom: 20px;
}
728x90
+ Recent posts
728x90